Creating a Cyanotype with Judith McDermott
I have been asked how I create my cyanotypes and I have put together a short tutorial for you if you are interested. I have learned a lot by reading many articles by other photographers who have been making these for many years and have been kind enough to share their methods. with that said I will also add a list of my favorite discoveries with additional (or might be better!) information at the end of this article.
Cyanotypes are not photographic images made with a camera but are related to the days of working in the darkroom inasmuch as they are created on chemical-sensitized paper and sunlight!
I first saw some cyanotype images of photographer/artist Jo Stephen (England) - (https://jostephenphotography.wordpress.com/) - that totally blew me away! Her images were made through a "wet" process instead of the traditional "dry" process and she is kind enough to give step-by-step instructions on how she creates them. You MUST check them out. Her work is absolutely outstanding!
The traditional cyanotype process was discovered in 1842 by Sir John Herschel and was used to make copies of architectural and engineering drawings. Chemicals are used to sensitize the paper which turns a Prussian Blue when exposed to sunlight (hence the name "Blueprints"!)
In a traditional ("dry") cyanotype, the paper is coated with the chemicals and left to dry in a dark place. To make a print, a negative (digital transparency) or object (leaves, flowers, shapes) are placed on the sensitized paper and exposed to sunlight (or a UV lamp). The exposed areas of the paper will turn blue and the areas covered up will remain white (or a lighter blue) with a silhouette effect.
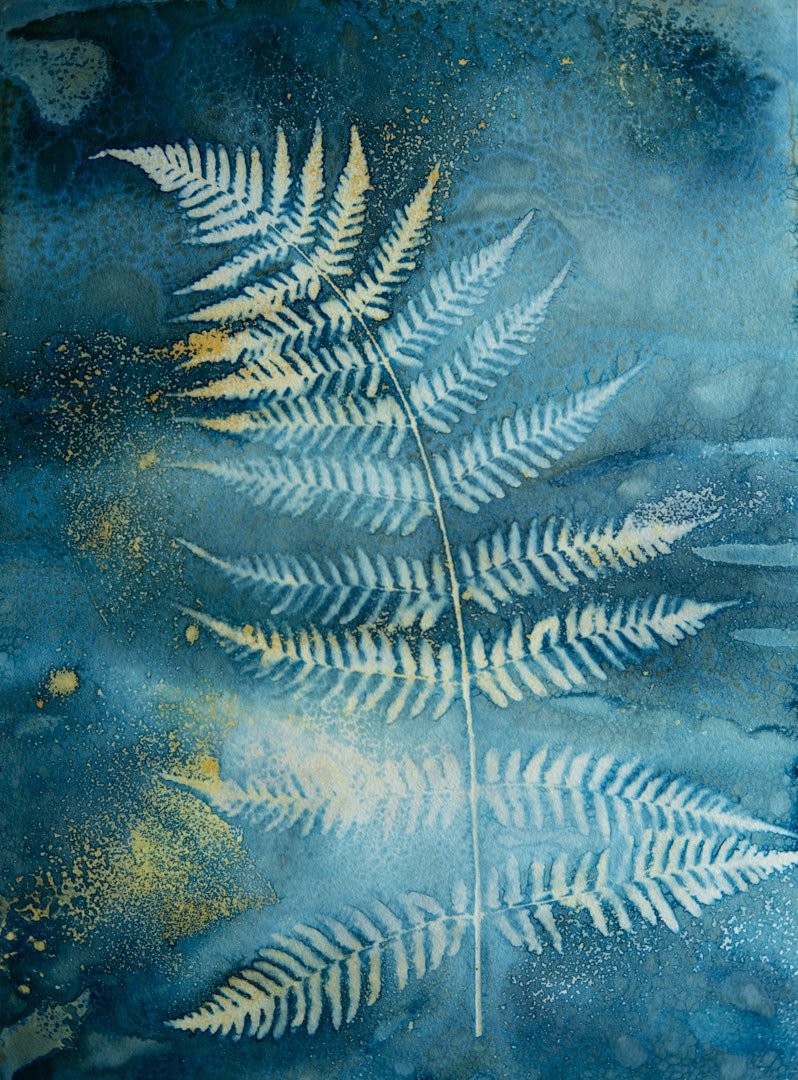
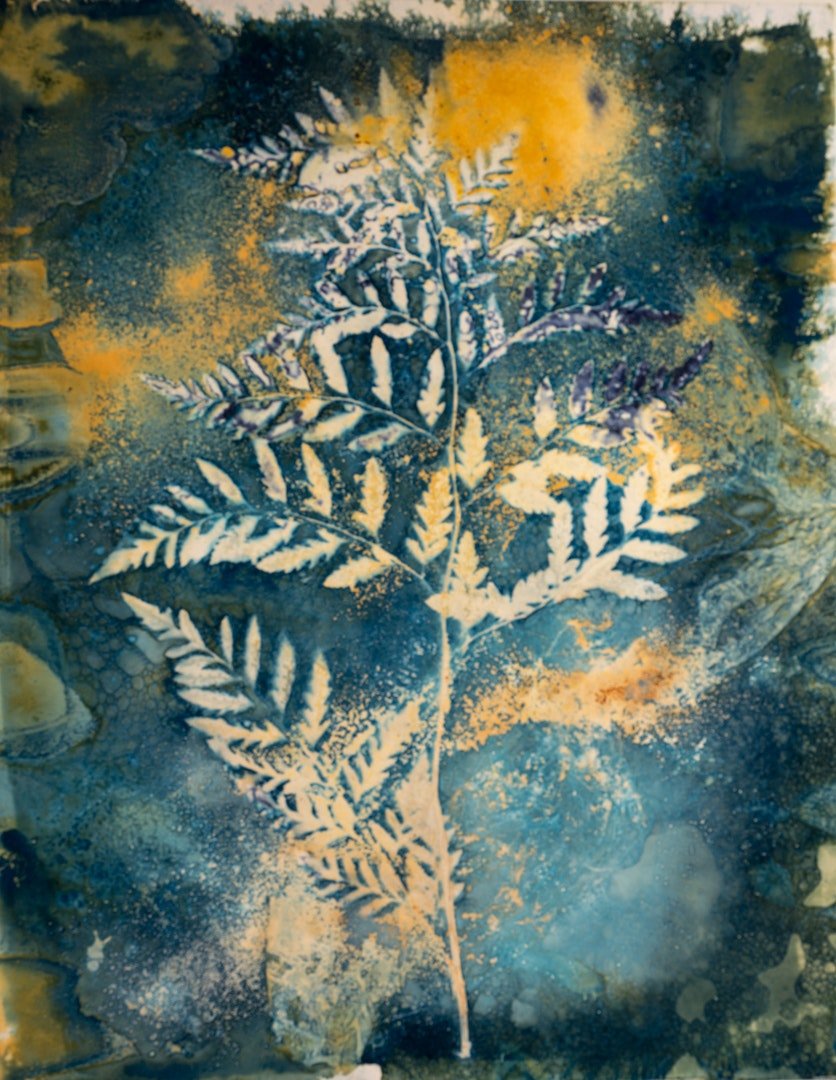
When making a wet cyanotype (which is the method I have been using) the objects (leaves, grasses, flowers etc.) are arranged on the wet paper after applying the chemicals along with other solutions (vinegar, soap bubbles, salt etc.) that cause some wonderful reactions and patterns with the cyanotype chemicals. The results are often unexpected, beautiful, and never the same twice!
Today these chemicals (potassium ferricyanide and ferric ammonium) can be purchased easily (I use Jacquards from Amazon) and applied to a somewhat absorbent surface (I have only tried different types of paper but other mediums such as fabric and wood are also popular). It is important to work away from daylight as it is sunlight (or ultraviolet light) exposure that will create your print. The length of time for exposure varies widely depending on the surface of the print and the strength of the light. The print is then developed by running under cold water and laid flat or hung up to dry.
I will outline my process but again I must give credit to Jo Stephen for her wonderful and detailed step-by-step instruction:

Method:
1. Working away from any daylight or UV light and wearing gloves and protective (or old) clothing, mix the two chemicals per the instructions. You will not need much to coat a single sheet of paper. The mixed solution is only stable for a relatively short time so only mix what you will use. (If I have mixed more than I need I use it to coat sheets of paper that I then put to dry (somewhere dark) for my granddaughter to create her own cyanotypes! She still makes the "Wet" process by spraying with water before exposing to the sun.
2. Arrange your "negatives" - leaves, feathers, flowers etc., on the wet paper. Add any soap bubbles, salt, vinegar, turmeric (adds a nice yellow touch), paprika (for orange/brown) or whatever else you'd like to experiment with!
3. Clamp the print between a stiff backing and a sheet of glass or Perspex (I use two sheets of glass) and expose to the sunlight or UV light source (I only use sunlight). The colors will change over time. The amount of time does depend on the print medium and the intensity of light. Experiment to see what works for you. Wet cyanotypes take longer than dry. I have left mine in full sun for a couple of hours and longer (on cloudy days). I think that these creative wet cyanotypes are very difficult to overexpose.
4. Wash your exposed print for a good 5 minutes, agitating the water and changing it as necessary until it runs clear. The blue color will become more saturated as the print oxidizes as it dries but this can accelerated by dipping your print in a diluted solution of Hydrogen Peroxide (one part to ~30 parts of water). This will make your print immediately a deeper Prussian Blue - the "magic" step as my granddaughter likes to call it! I often prefer to leave the prints as they are - especially with all the other colors that the additions of vinegar, salt, soap, and whatever else you have used create. You are the artist here so experiment and have fun!

I hope this is helpful to anyone who would like to try and create their own Cyanotype art. There are lots of YouTube videos, blogs, and other web sources on making these as well as other ways to use the Cyanotype process to create prints. Enjoy!
A list of essential supplies and a few additional optional items:
Must haves:
Chemicals - ammonium ferric citrate and potassium ferricyanide. I prefer the simplicity of the premixed types such as Jacquards that I ordered from Amazon. It comes in two bottles marked A and B and is mixed in equal parts.
Protective clothing and gloves (otherwise your hands may end up blue!).
A brush (sponge brush works fine or a hake brush which has no metal that might react with the chemicals)
Paper or other absorbent material upon which to create your image. I have only used paper but I know of others who have used fabric, wood, leather, even egg shells! If you decide to use paper then it should be a heavy weighted paper (like a watercolor paper) since it will have to hold up to a good washing. Also paper that is acid free will give you prints that will last. You can always look for the label stating that a paper is "archival". Paper also can be "hot press" which is smoother or " cold press" which is rougher. Experiment, experiment, experiment! (I even used some digital ink photo paper on the "right" side and the "wrong" side and got some pretty interesting results!)
Stuff to lay on the paper and block the light. I am using all kinds of flowers and leaves - some pre pressed and some not - and loving the results. Take a walk and bring along a bag to put your finds in!
Two panes of glass. You could use a board or something else for the backing but I find two sheets of glass (old picture frame glass) easy to use and reuse. I highly recommend covering the edges of the glass with some kind of tape to avoid nasty cuts! I say this from experience!
Clips/clamps to clamp to two pieces of glass together.
An outdoor space to lay your prints once clamped within the glass. For hours possibly. Or a UV light set up which I don't use and cannot speak to but you will need daylight or a lamp. A lamp I understand takes a considerable shorter time to expose the print.
Shallow tray or a sink, bathtub or shower tray will suffice. Somewhere to rinse your prints. So big enough to hold your paper size.
Somewhere to dry your prints (flat or hanging).
Non-essential (but fun) items:
Dish soap to make bubbles to add to the print.
Vinegar or lemon juice. I just used cider vinegar because I have so much of it.
Salt.
Coffee grounds ( for toning) or spices such as paprika, turmeric, mustard powder etc. these can be sprinkled onto your wet cyanotype or mixed to a watery paste and applied.
Hydrogen peroxide if you want to add it to the final rinse (ratio about 30:1) to accelerate the process. It turns the print a Prussian blue immediately.
Other things that might react with the cyanotype chemicals - experiment and see what you like!
I doubt this is an inclusive list so share your results if you decide to try this!
A few of my favorite resources:
https://jostephenphotography.wordpress.com/
https://the-epic-compendium.com/category/photography/alte...
To find more on Judith McDermott follow these:
Instagram: https://instagram.com/judithmcdermott.photography
web-site: http://judith-mcdermott.pixels.com